For a planted aquarist, there is not greater displeasing sight than the sight of algae invading his tank. Every planted tank enthusiast would, at some time or the other , have issues with algae in his tank. These algae are not only displeasing to the eye, but also take over the tank fully if not brought under control quickly.
Among them, the Black Brush Algae or the BBA is one of the most difficult algae to deal with. Some refer to this as Black Beard Algae too. This algae starts as a small black brushy patch on a leaf or decorative item, and then spreads rapidly all over the aquarium , turning everything it touches into a black carpet. I’ve seen this BBA grow even on my aquarium glass and the silicone tubing’s inside the tank. It is generally first seen on the leaves of slow growing plants such as Anubias and Ferns.
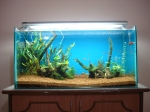
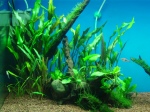
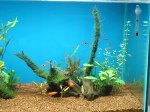
Here is a pic of how the BBA would look in a aquarium.

BBA
There are many causes and reasons cited for the presence and spread of this algae in the tank, and I would not like to go into the details of these causes. I would just like to mention here that nutrient imbalance and improper ( excess ) lighting are the main cause of this algae .
I would like to detail here the various methods in use to prevent the spread of this algae and the methods that I used to control BBA in my tanks. ( Note that we do not talk about methods of preventing the occurrence of BBA, since BBA spores ( or for that matter any algae spores ) are present in almost all aquariums . Hence ‘control’ is a more appropriate word than ‘prevent’ in this context. )
a) Nutrient and Light Control
Excess light and nutrients in the tank are considered to be the main cause of BBA. For most aquarist’s it’s difficult to derive/predict the exact amount of nutrients required for the plants in the aquarium. We generally end up over dosing or under-dosing the nutrients. Same is the case when it comes to lighting, in terms of predicting the wattage( or lumens ) or the photo period required by the plants. Since excess of these generally leads to algae bloom, it’s better to err on the lower side. Hence, If it’s a newly set-up tank , start with small quantity of dosing and lower lighting period ( since the wattage is generally fixed on buying a lighting fixture. ). These can be gradually increased after seeing the response of the plants.
Similarly, on the out break of BBA, a sure-shot way of controlling the spread of BBA is controlling ( reducing ) the lighting period and dosing levels. Sure, your plants might get affected a little, but in my opinion , it’s better to have slower growing plants with no BBA, than having fast plant growth with equivalently fast spreading BBA in your tank. Since it’s very difficult to predict the ‘exact’ levels of nutrients and lighting period that would make the BBA disappear, at the least, reducing dosing and lighting period may help control the spread of BBA to a large extent.
You can then try some of the below methods to completely eliminate BBA.
b) Introducing BBA eating fish
Many aquarist’s have had varying degree of success in tackling BBA with algae eating fish. Some have reported no success . A few fish like ‘True’ Siamese Algae eater, Black Mollies, American Flag fish, Swordtails etc are know to eat BBA in the aquarium. The ‘True’ Siamese Algae eater is the popular choice among aquarist’s for controlling BBA in a planted tank. ( In some cases, the True SAE is also know to eat away the moss in the tank, as in my case ) . On the contrary, I have also had fellow hobbyist’s complain that they have never seen these fish eat any BBA in their tanks. I have used Black Mollie successfully in reducing the BBA from my tank.
The trick here is to keep the BBA eating fish hungry. A well fed fish in a tank rarely gets interested in eating the not-so-delicious BBA. So you have to make sure that your keep your BBA eating fish hungry enough for them to go after BBA. But the catch 22 situation here is that you have to keep the other fish in the tank well fed, but the BBA eating fish hungry. How you accomplish it, is left to your creative thinking.
Some ideas include transferring your other fish from the BBA infested tank into another temporary tank and keep only the BBA eating fish in the infested tank and feeding them minimally.
c) Bleach Dip or Potassium Permanganate dip
Another quick way to get off BBA is to dip the BBA infested plants or decors in a 1:20 home bleach solution. Home liquid bleach ( i.e liquid cloth bleach ) is available in India under different brands such as ‘Rin Aala’, Robin Liquid Bleach etc . Though this is a very quick and cost effective method to get rid of BBA, it works only if the affected plants or decor can be taken out of the aquarium for the bleach dip. Hence it can be used for affected plants such as Anubias and Fern , but cannot be used for deeply rooted plants since you cannot uproot them as and when required.
Dip the affected plants or decor in the 1:20 bleach solution for about 10-15 mins and then thoroughly rinse the plant/decor in running water. Remember, bleach, if it enters your tank, can be dangerous to the fish in the tank. You can put back the plant/decor into the tank after rinsing them. The algae turns whitish in the next few days and can be removed easily by hand/brush or can be left to slowly fall off from the infected area.
The time for which you dip plants in the bleach solution depends on which plant is being dipped. Sturdy plants with stronger leaves like the anubias and fern’s can be dipped for upto 15 min, whereas soft leaved plants like bacopa and crypts should only be dipped for 3-5 min. I have lost a whole bunch of Bacopa Monarie after I left it in the bleach for 15 mins. ( I was rescaping my old tank and decided to uproot all my infected plants ).
The same effect can be obtained using diluted Potassium Permanganate ( KMnO4) as the dip solution. But bleach is more effective and a cheaper option.
d) Hydrogen Peroxide Nuking
For plants that cannot be taken out of the tank for a bleach dip, another solution is to spray Hydrogen Peroxide ( H2O2 ) to the infected area using a syringe. H2O2 is available cheaply in all chemist stores. Fill a 5ml syringe with H2O2 and spray it to the affected area in the tank. ( Remember to switch off the filter before doing so, else the water current will spread out the sprayed H2O2 ) . This is termed a ‘nuking’ of BBA. ( Never understood why it’s called so 🙂 ). After ‘nuking’ you can see a lot of nascent oxygen bubbles emanating from the area to which H2O2 was sprayed. This resembles the bubbles coming out of a champagne glass. Over the next couple of days, the BBA in this area turns whitish or pinking as in the case of bleach dip and fades away.
I have had minimal improvements with this method of BBA control. The issue with applying this method successfully is that since H2O2 is introduced directly into the tank, you have to be very careful of the quantity introduced( sprayed ). Since H2O2 can be harmful to the fish in higher concentrations, you can use this method on only smaller and restricted areas in the fish tank. Never-the-less, it still works fine on smaller patches on BBA infestation. You also need to be careful if you have delicate ‘soft tissue’ plants like Riccia in the vicinity of the place where you plan to inject H2O2. Riccia reacts badly to even the slightest dose of H2O2. My entire Riccia tied onto a stone turned pale yellow and withered away when I injected H2O2 on nearby Anubias leaves covered with BBA.
Using the above methods, an aquarist can successfully control and eliminate BBA from his prized tank.
There may be other methods too to control the BBA. If you know of any other method, do share it by dropping a note. Suggestions or comments on this topic are always welcome.
Prabhu M


